
Thursday, December 27, 2012
Vintage Singer Machine
Wednesday, November 28, 2012
Joe's 7330 Simplicity Shirt Finale
Joe's Simplicity 7330 shirt came together rather nicely. The french seams gave it a more professional finish. I used my Greist buttonholer for the button holes.
Again, I really like this pattern. It has no hand sewing. It makes for a professional looking finish. I have been doing the notched-collar version. Next time I am going to try it with the collar band with long sleeves.
Thanks for stopping.
 |
| Back View |
 |
| Front View |
As you can see, I like my top button higher than Joe does.
 |
| Comparing my 7330 to Joe's 7330 |
 |
| Close-up of collar |
Thanks for stopping.
Sunday, November 25, 2012
French Seams For Joe's 7330 Simplicity Shirt
The shirt has been coming along quite well. Today I decided I would try to do French Seams. Actually, they were quite easy and did not take too much time. It sure gives the shirt a nice finish. Only thing left now is the armholes, but I think I will over-edge those.
First, I sewed the shirt with a 1/4" seam with insides together. Then I folded the material good sides together, ironed the seam, then stitched a 1/2" seam. I opened up the material and ironed the seams again.
That was it.
I should have the shirt finished pretty soon.
Thanks for stopping.
First, I sewed the shirt with a 1/4" seam with insides together. Then I folded the material good sides together, ironed the seam, then stitched a 1/2" seam. I opened up the material and ironed the seams again.
That was it.
 |
| Stitch 1/4" seam with back-sides together |
 |
| Folded and ironed before stitching |
 |
| Finished seam inside |
 |
| Finished seam |
Thanks for stopping.
Tuesday, November 13, 2012
Joe's 7330 Simplicity Shirt update
I have been working on Joe's new shirt over the past few days. It has been coming along fairly quickly. Since I made this pattern before, it saves some of those "Duh, that is what the instructions mean" moments.
I purchased a new iron a few weeks ago. My old one was still heating, but the steam had not been working for quite a while. What a difference a little steam makes!
I sewed on the pocket to the left side. There was not enough material to cut the pocket out so the stripes would match perfectly, I did the best I could do. Lines up pretty good.

One thing I like about this pattern is the steps it saves by having the front placket all one piece. A person simply irons in the interfacing and folds over to form the placket. No sewing the placket on.

A new trick I found on a informative blog off-the-cuff-style.blogspot.com makes the collar points nice and easy. I also watched a video on you tube by BrianSews.com about this method.
Sew the long end of the collar. Put a piece of looped thread against the seam and let it hang out as shown.

Sew the short ends. Set the stitch to a shorter distance as you near the the looped thread. As you turn the collar right-side out, pull on the tails of the thread until the collar point pops out. The looped thread just pulls out and you have a nice point.

Finished collar without all the trimming and fussing.

A nice sharp point.

That is it for the update.
Thanks for stopping.
I purchased a new iron a few weeks ago. My old one was still heating, but the steam had not been working for quite a while. What a difference a little steam makes!
 |
| Black and Decker Iron |
I sewed on the pocket to the left side. There was not enough material to cut the pocket out so the stripes would match perfectly, I did the best I could do. Lines up pretty good.

One thing I like about this pattern is the steps it saves by having the front placket all one piece. A person simply irons in the interfacing and folds over to form the placket. No sewing the placket on.

A new trick I found on a informative blog off-the-cuff-style.blogspot.com makes the collar points nice and easy. I also watched a video on you tube by BrianSews.com about this method.
Sew the long end of the collar. Put a piece of looped thread against the seam and let it hang out as shown.

Sew the short ends. Set the stitch to a shorter distance as you near the the looped thread. As you turn the collar right-side out, pull on the tails of the thread until the collar point pops out. The looped thread just pulls out and you have a nice point.

Finished collar without all the trimming and fussing.

A nice sharp point.
That is it for the update.
Thanks for stopping.
Monday, November 5, 2012
Starting a Simplicity 7330 Shirt for Joe
I found some material at the thrift store perfect for a shirt for Joe. It had a little tag on it saying "Bamboo Shoots". I think that is a perfect description. It will fit Joe's personality. As I mentioned in my last blog, I liked the Simplicity 7330 so much I made for myself, I decided to make a shirt for Joe with the same pattern. I traced and cut out a new pattern since Joe wears a medium.
The Zip Snip cutter made cutting the material a breeze. Now everything is ready to start sewing together.
 |
| Cutting out Medium pattern |
 |
| All pinned and ready to cut |
 |
| Cut out |
 |
| Interfacing |
Thanks for stopping.
Wednesday, October 17, 2012
Kids, Colors, and Sewing
There was a variety of activities this week. I went to my grand-nephew's first birthday party. His name is Chase, and he is a wonderful little boy.
Joe, Max, and I rode up to look at fall colors with Larry and his wife Karen. Hope Valley is only an hour from where we live. It is always a pretty place. We like to camp there. However, this day it was just for a picnic and picture taking.
I also finished my Simplicity 7330 shirt. I really like this pattern. There is no hand sewing and the collar is quite simple. It looks 50s or 60s retro, even though the pattern is from 1991.
I like this pattern so much, I am going to make a shirt for Joe with it as my next project.
Thanks for stopping.
 |
| Chase enjoying his party |
Joe, Max, and I rode up to look at fall colors with Larry and his wife Karen. Hope Valley is only an hour from where we live. It is always a pretty place. We like to camp there. However, this day it was just for a picnic and picture taking.
 |
| Post Card Pretty |
 |
| Joe and Max enjoying the scenery |
I like this pattern so much, I am going to make a shirt for Joe with it as my next project.
 |
| Retro shirt |
Saturday, September 22, 2012
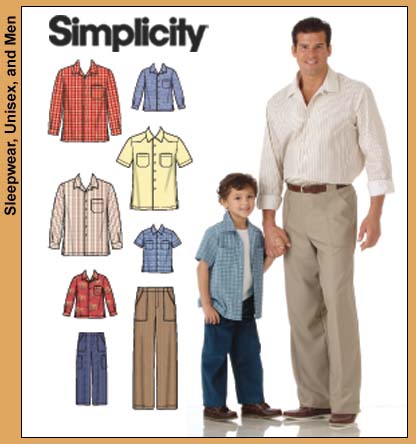
Simplicity 7330 Shirt
I found some material with an interesting pattern just right for a short sleeve shirt. One problem with buying material at a thrift store is you don't always get the yardage presented. The tag on the material read 2 1/2 yards. I decided I could make another McCalls 3 hour shirt in a short sleeve. However, when I opened up the material at home, it was exactly 2 yards. What to do now? I looked through my stash and found a Simplicity 7330 pattern which is also represented as a 3 hour shirt. It needed 2 yards. I thought great, and started cutting.
Speaking of cutting, My friend Larry gave me a rechargeable cutter called Zip Snip. It worked great for cutting the material. I can't believe how much easier than scissors this cut the material.
Speaking of cutting, My friend Larry gave me a rechargeable cutter called Zip Snip. It worked great for cutting the material. I can't believe how much easier than scissors this cut the material.
 |
| Simplicity 7330 |
 |
| The Zip Snip on the shirt material. |
 |
| Fits my hand perfectly. |
.
Thanks for stopping.Wednesday, September 5, 2012
Simplicity 4760 Pants Review
I put the finishing touches on my new Simplicity 4760 pants. I sewed them with my vintage Kenmore and I overedged the seams with my Brother 523 overedge machine.
I think they turned out great. They are comfortable and fit well. The extra pockets are great for a cell phone or other extras.
I would definitely make these again keeping in mind I had to take some material out of the legs otherwise they would have been baggy. Also, I had to add a few inches to the waistband like another reviewer did on pattern review.
.


 Thanks for stopping.
I think they turned out great. They are comfortable and fit well. The extra pockets are great for a cell phone or other extras.
I would definitely make these again keeping in mind I had to take some material out of the legs otherwise they would have been baggy. Also, I had to add a few inches to the waistband like another reviewer did on pattern review.
.


Friday, August 24, 2012
Simplicity pants pockets
 |
| Unfinished view |
 |
| Side Pocket |
 |
| Front pocket |
Now I need to put on the waistband, button, and some finishing touches.
See you next time.
Friday, August 3, 2012
Button, Button. Who has the button?
Do you remember at the end when they are in the elevator and Willy Wonka says "Button, Button. Who has the button"? That is my favorite line from Willy Wonka. I use that line all the time when looking for a light switch or a button on a piece of machinery. Now, I am using it in regards to my new pants.
I have been working on my Simplicity 4760 cargo pants. I decided to sew them with my vintage Kenmore. Everything has been going fine until I started on the button. The button is sewed into the fly and backwards to what I would think. So, the button will not show when the pants are on, because the button will be turned inwards towards your stomach. Anyone have some input?
In the reviews and pictures, no one shows the button or talks about it. Most talk about the fly. The fly seems straight forward. It is that button that is bothering me. Well, I guess I'll keep going and if the button is not correct, I will try to put one in another place at the end.
The pockets are next, according to the instructions.
Thanks for stopping.
I have been working on my Simplicity 4760 cargo pants. I decided to sew them with my vintage Kenmore. Everything has been going fine until I started on the button. The button is sewed into the fly and backwards to what I would think. So, the button will not show when the pants are on, because the button will be turned inwards towards your stomach. Anyone have some input?
In the reviews and pictures, no one shows the button or talks about it. Most talk about the fly. The fly seems straight forward. It is that button that is bothering me. Well, I guess I'll keep going and if the button is not correct, I will try to put one in another place at the end.
 |
| Fly open, showing button hole. |
 |
| Looks like pants. |
The pockets are next, according to the instructions.
Thanks for stopping.
Sunday, July 29, 2012
Another pants saga begins
I purchased some khaki colored material that will be great to make some pants with. I bought it at the local thrift store. Only $4 for three yards of material and 25 cents for the zipper , I won't be too upset if they don't turn out. I decided to use Simplicity pattern 4760 since it has some decent reviews on pattern review.
When I made the Vogue 8801 jeans, there was not a review on them. So, I wasn't sure if my problems with them were exactly that, my problems. But now that there is a review of them on pattern review, I feel better because that reviewer had the same difficulties I did.
These will be a cargo style, so should be fun to make and wear.

Thanks for stopping.
When I made the Vogue 8801 jeans, there was not a review on them. So, I wasn't sure if my problems with them were exactly that, my problems. But now that there is a review of them on pattern review, I feel better because that reviewer had the same difficulties I did.
These will be a cargo style, so should be fun to make and wear.
Thanks for stopping.
Saturday, July 14, 2012
McCall's 4079 Impressions
I finished my white McCall's 4079 shirt.
I really like this pattern and instructions. I am sure I will make it again, probably with a short sleeve next time. I have such a long, narrow build, that I made the shirt in a small with the addition of two inches to the sleeves, and three inches to the overall length of the shirt. I also added a pocket.
 I like the look and feel of this shirt. The collar is a good size. The whole shirt looks elegant.

 Made for casual wearing, and tucked-in for a more formal look.
One thing I like about making my shirts, I can decide where the top button goes. I like my top button a little higher than most.
 This is the first project I used my overedge machine. It gave the finish a professional look in a matter of minutes.
I enjoyed this project. Now time to decide on my next.
I really like this pattern and instructions. I am sure I will make it again, probably with a short sleeve next time. I have such a long, narrow build, that I made the shirt in a small with the addition of two inches to the sleeves, and three inches to the overall length of the shirt. I also added a pocket.


One thing I like about making my shirts, I can decide where the top button goes. I like my top button a little higher than most.

I enjoyed this project. Now time to decide on my next.
Monday, July 9, 2012
McCall's 4079 home stretch
My McCall's 4079 is almost completed. The last few days have been over 100 degrees here in Sunny California, so I stayed inside to keep cool and worked on my shirt.
I need to finish the hem. Then I am going to use my over-edging machine to neatly finish the seams.
Once that is done, a good wash to get the blue marking pen off, and I will have a new shirt to wear.
 My Greist buttonholer worked great for the nine buttons. I like the button holes it makes so much more than the built in one on my Brother.
I might not get to wear it for a few months until it cools off a little. Speaking of that, time for a Miller beer to cool off now.
I need to finish the hem. Then I am going to use my over-edging machine to neatly finish the seams.
Once that is done, a good wash to get the blue marking pen off, and I will have a new shirt to wear.

I might not get to wear it for a few months until it cools off a little. Speaking of that, time for a Miller beer to cool off now.
Wednesday, July 4, 2012
McCall's 4079 shirt update
I have been moving along slowly on my McCall's 4079 shirt. It is not the shirt or the pattern, it is me being slow. Among other setbacks, I ran out of thread and didn't go to the store for a week.
I have the left sleeve basted onto the shirt, checking it for fit. I added two inches to the sleeve so it would be the correct length. I also added three inches to the length of the shirt. I have white buttons for this shirt, hope it is not too much white.
The collar looks great, but I attached it and reattached it more time than I care to admit or remember.
 The shirt has pleats in the back. First shirt I made with pleats.
 I am happy some of my Zinnias are beginning to bloom.
 Thanks for stopping to see the update.
I am sure I will have it finished before long.
I have the left sleeve basted onto the shirt, checking it for fit. I added two inches to the sleeve so it would be the correct length. I also added three inches to the length of the shirt. I have white buttons for this shirt, hope it is not too much white.
The collar looks great, but I attached it and reattached it more time than I care to admit or remember.


I am sure I will have it finished before long.
Tuesday, June 12, 2012
McCall's 4079 Shirt
I started on the McCall's 4079 shirt. This pattern has good reviews on Pattern Review. I decided to do the long-sleeve version with collar(view D) and add a pocket. I am using some very soft white cotton-weave material I purchased at the thrift store. It has a subtle pattern of some lines and little poofs here and there.
I usually trace my patterns onto tissue paper I buy at the Dollar store. It is very economical.
Now it is all cut out and marked. I'll start to assemble it next.
I purchased an older over-edge machine on eBay. It was a terrific deal, including the owner's manual and the original box. It is a Brother 523 three-thread. Once I get the tension adjusted and figure out how to use it, I'll use it on my next project.
See you next time.
I usually trace my patterns onto tissue paper I buy at the Dollar store. It is very economical.
 |
| Material |
 |
| Cutting out |
 |
| Pattern |
I purchased an older over-edge machine on eBay. It was a terrific deal, including the owner's manual and the original box. It is a Brother 523 three-thread. Once I get the tension adjusted and figure out how to use it, I'll use it on my next project.
 |
| Brother 523 |
Thursday, May 24, 2012
Boxer Shorts for Joe
When I started on the boxer project, I was originally going to make the first pair for Joe. But then I decided better to make me a pair first to get all the kinks out, then make a pair for him.
Joe's Boxers went a lot faster. I easily drew a pattern in a medium size for him. If you remember, I followed some directions off the internet to draw the pattern myself.
I used the same fabric I used for my boxers, however I used red thread so the decorative stitch of my Vintage Kenmore would show.
I have now decided to return to shirt sewing. I found some nice white cotton/linen material at the thrift-store I am going to use to make myself a McCall's 4079 shirt. This looks like it will be a nice casual style that will go well with the fabric I have. I had the pattern in my stash, and now with the proper material, I am going to give it a go.
I think I will use my Brother XL2600I to make this shirt. I used it yesterday to hem some pants for a friend. I will say, once a person figures out how to fold the fabric for the blind-hem stitch, this machine sews it beautifully with the included blind-hem foot.
Also, I have been planting some zinnias, marigolds, tomatoes, pumpkins, and other vegetables in the garden I grew from seed. So in between watering the garden, I will be working on the shirt.
See you next time.
Joe's Boxers went a lot faster. I easily drew a pattern in a medium size for him. If you remember, I followed some directions off the internet to draw the pattern myself.
I used the same fabric I used for my boxers, however I used red thread so the decorative stitch of my Vintage Kenmore would show.
 |
| Decorative stitch |
 |
| Modeled with McCall's 6231 top |
 |
| Another view |
I think I will use my Brother XL2600I to make this shirt. I used it yesterday to hem some pants for a friend. I will say, once a person figures out how to fold the fabric for the blind-hem stitch, this machine sews it beautifully with the included blind-hem foot.
Also, I have been planting some zinnias, marigolds, tomatoes, pumpkins, and other vegetables in the garden I grew from seed. So in between watering the garden, I will be working on the shirt.
See you next time.
Subscribe to:
Posts (Atom)